Saturday, 19 March 2016

Art Doll Number 2

After the success of my first doll, purely my opinion of course. I decided I needed o do another, just in case it was a fluke.
Well the ideas were flowing and literally kept me awake at night, I needed wire so much so that hubby went into the garage and found me some, bless him.

I began by making a wire base for my project which incidentally was a mermaid art doll, after about two days the wire work was complete, yes! two days.
 
 
The framework was partly covered by masking tape leaving bits of wire showing, then a layer of  fabric plaster which you dip into water and smooth over your project then leave to dry. Sorry forgot to photograph that bit.
 

A layer of texture paste was added by using the tip of the palette knife to create the scale effect.
 
 
A face was created with paper clay, I would have used a mould but I didn't have one big enough so I had to go free hand (not bad if I do say so myself, blowing my own trumpet again. Lol).
 
 
Cheesecloth was added overlapping the gaps in the wire just for more texture and I thought it looked good.
The face was left to dry out ummm! Another few days drying time.
Metal embellishments,  large art stones and a couple of boob like shells were added to enhance the doll and create a barnical look attached to the body and tail.
 
 
Strings of coiled wire made the hair this was then coloured with Paperartsy paints along with the torso and face. Metallic paints were used to colour the tail and head wear in different tones of blue (and the shell boobs).

Lovely rusty ribbon gave the hair thickness and colour along with micro beads to create a fringe.
More micro beads added detail with the addition of small shells, which also made a necklace for my mermaid doll.
A small seahorse embellishment was made from UTEE and a homemade mould, this was tied around the mermaids body with a tad of string.
 
 
I think I've covered everything, thank you once again Paperartsy for bringing up this challenge, you can find lots of art doll inspiration at http://blog.paperartsy.co.uk
can find lots of wonderful inspiration   and to Rebecca who suggested we make an art doll, Rebecca's has now been posted you can find it here.
 
Here are a few more pictures.


Hope you like it.
 
 
Sue X


Sunday, 13 March 2016

SDC235 - Include Flowers in your Project

 Its Saturday evening already and I haven't made my SDC entry yet, panic mode is setting in. 
I was a little distracted by other projects this week the latest of which was an Art Doll, check out the older posts if you would like to read all about it.

So moving on, over on the SDC  blog this week Carol Fox is our hostess and her challenge is to include some lovely spring flowers in our projects. This is what Carol said about the project:
"Spring is just around the corner in the Uk. So share with me a project with flowers in it."

I decided on a card  for this one as I have a few more birthdays coming up and because of being a bit late in the day to make a larger project.
I began with a mask with a central flower, I applied Gelatoes directly onto the mask to see what would happen if I added water and used it as a stamp. This method worked well on an actual stamp as in  last weeks challenge, hence why I tried this out, don't know till you try it Wright.
Anyhow didn't work out as I wanted or expected but it did create a nice colourful splatter  background to work on.


So I used the mask again with distress ink and used an applicator to push the ink through and create pretty flowers. 


 A 14cm x14cm square was cut from this card inked with black around the edge.
 A stamp was then used to create the field of Daisy's effect firstly in watering can archival ink then over stamping in black. A white marker was used to colour the flowers, yellow centres were added and a touch of green added to the stems. This was then attached to the card base.

My little character and cat was stamped and coloured with water colour pencils, cut out then layered onto the card along with a few die cut clouds with a wording stamped onto the larger one.

Card complete, for more inspiration hop on over to the SDC blog here.

Sue X


Saturday, 12 March 2016

Paperartsy Topic 5 - Art Dolls

Over on Paperartsy their new topic is Art Dolls check out the initial posting here, it contains a great video which my crafting buddy and I found our mojo from to create our art dolls.

Rebecca and I have been trying to have a play day at least once every half term, so when she said come on round and we are going to make Art Dolls I jumped at the opportunity.

I gathered my supplies and off I went. 

At this point I diverse a little, many, many moons ago (about two years) on one of my crafting buddy's trips to IKEA she returned with a couple of alarm clocks. 
We took these clocks apart and inked them with alcohol inks in golds, fab effect.
That is as far as we got on that day, since then they have been lying unloved in a draw.
We decided to incorporate the unloved clocks into the skirts of our dolls, Rebecca wasn't happy with her colours and so repainted it. 
 
While this was going on I put my head together literally.
With the knowledge of making these dolls a day in advance I made a mould from a barbie dolls face (barbie found in toy cupboard),  a paper clay impression was then taken and that is what formed our faces.
Metal embellishments were layered up and glued together the face was added and small beads inlayed around the face to fill the gaps and add detail. Rusty wire was curled with pliers to create the whispy tendrils of hair which petrude between the metal bits a long hat pin was threaded through the back to enable me to attach it to the body.

 
The face was painted black and then highlighted with good old treasure gold in various shades of gold.
 

Back to the frame work.
We began by making a wire frame to base our work on, I wanted to make a tall skirted doll and Rebecca wanted a version with a bustle to the rear (immediately the thought of the children's film Robots popped in our heads, great minds think alike - robot, big butts, clocks). 
Back to the task at hand, after a while of puffing and panting, twisting and turning, a few murmurs of complaints about the pliers not being up to the job the frame work was finally done.

I eventually decided on using tissue paper to add the first layer of colour this was attached with print stick believe it or not. 


 While that was drying I made the arms from more rusty wire (very messy), making the initial first piece with loops at each end. The second layer of rusty wire was wrapped around the first layer using a paint brush held along the length to create a looser loop (paintbrush removed obviously).


Then we ran out of time, I had to rush home and be the doting mum (pretend I'd been waiting for them to return all day, LOL).
Refreshments and snacks on the table for girls and back to it.
Book pages were inked in Rusty Hinge distress ink and torn into strips, Gathered Twigs distress ink and was added to the edges for a shaded effect. Rusty Hinge was added to the tissue paper to take away the harsh yellow colour and the torn book pages layered over the top.
Lengths of cheese cloth were distressed by pulling the threads apart and this was added to the waist line dangling down. 
Gloss medium was added over the top to make it more robust which made the distress ink spread to the cheese cloth in places, very cool effect.
The head had also been attached to a large bead which Rebecca found for me this was coloured with treasure gold in matching colours and the head was attached to the body, the arms and a set of rusty wings were added. Micro beads, beads and sequins were added to the wings and dress form to add detail, almost finished.
This is turning into a mega post!

Now to the clock! basically the clock was coloured with inks as previous stated, so all I had to do was to create a clock face and add a few embellishments.
A clock face was printed off and trimmed down to size, I knew I wanted to be able to see through the face and so I sandwiched it between two circles of acetate, clock hands were added. Not being completely happy I stuck die cut cogs which had been treated to a touch of treasure gold onto another circle of acetate and secured it to the back of the clock.

Apologies to Rebecca, I have used a few tiny metal roses (I know I'm banned from using them on our projects but it just needed them). These were placed in the bottom of the clock where I had left a gap between the rim and clock face (deliberately of course) along with more micro beads, regular beads and sequins. A Small round tag with message was stuck to the bodice bead, and a chain with a key attached was added to the hands.
The clock was placed in position and mission accomplished. Art doll complete.


First Ever Art Doll Finished! 


Sue X


Sunday, 6 March 2016

Mothers Day Cards

 
What a busy week I've had all these card and stuff.
 
Obviously I couldn't  post this until the mothers had received their cards so here they are in all there glory.  The same but different.


And this is how they were made!
 
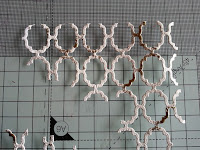
The lattice work was die cut and heat embossed with white sea foam embossing powder then gold emboss power was added in random places to add a touch of bling.
 
 
The box front was made using concertinaed card strips slightly smaller than the card size to create a fame. The edges were secured by interlacing the ridges and gluing into place. This frame was glued to the front of the card. 
 

 Using a square die set, a frame was made to size  from a patterned card then stuck above the  folded frame to make a nice neat top edge, patterned card again was used to line the inside of the card face.
 
 
The lattice work was then glued between the folds to give the impression of being raised.

 
Moss was pushed under the lattice and glued into position. A few leaves were stamped, die cut, shaped and glued into position.

 
Flowers were made and a few other embellishments were added and stuck down.
 
Cards complete!
 
Sue X


Saturday, 5 March 2016

More Paint Brush Art

Just about feeling better after what seems like an age of coughing, sneezing and blowing my nose. I thought yeah! then night time arrives and it's back with a vengeance.
Anyhow, because I was feeling ok during the day I took a couple of my makes to the local-ish craft shop where they instantly booked in a class to make them.

Now then as you may or may not know when working for a craft shop you really should make the item from craft materials available to buy in the shop. 
So armed with a few new paints and goodies I attempted to recreate my example with what is available to buy in the shop.

To begin, purchase a paintbrush available from any good DIY shop or the range sell a selection at a reasonable price.


Give the paint brush a light coat of gesso to provide a grip for top layers, use the gesso on the paint brush bristles to give the impression that the brush has been used.


A new paint range is available in the shop called Nuvo never used them before so I picked up an olive green and burnt umber(brown), after using gesso the paint appeared translucent which is fortunate as I wanted to see stands of white beneath. 
Next up was to mix clear texture paste with brown paint and flakes to create texture to both the front and back of the project, this was helped along with a heat gun which also made the bristles shrink up and distort a little.


While the texture paste was still wet nuvo glitter in a bronze/brown colour was sprinkled over randomly.
A touch of caramel and white paint was added with finger tips to add dimension to the texture.


A small amount of cheese cloth was teased apart and glued onto the front of the brush followed by a touch of natural fibres. Moss and cones were place in position and stuck down.

 
Flowers were created from the heartfelt poppy die, two of the medium size plus two of the small size were cut and coloured with scattered straw distress ink. These were then spritzed with water and shaped over a paintbrush handle by pinching the petals to form tiny ridges, then left to dry naturally.


The six smaller flowers were left white  misted with water, using a large ball tool to press into the petal to create a rounded effect with small creases around the edge, two leaves per flower. The centres were made with a glue gun a tad of white glitter followed by a touch of  white glue around the centre and a touch of flower soft. The tiny tiny flowers were made from the same three leaf petal by fussy cutting across each petal, a small ball tool was used to press into the centre creating a small flower. A hole was put in centre with a pointy tool and a stamen thread through and stuck with a touch of glue.


The bits were assembled and glued into position. A touch more white paint was used to highlight raised edges and also a tad more glitter and flakes.


Here is the finished project.

And here are a few more photos.


Hope you like it.
 
Sue X
 

Thursday, 3 March 2016

Busy month for card making!

March is an extremely busy month for card making especially the beginning. Family, friends and mothers day!
 
So here are a few I've been busy making.
 
For these two cards distress ink pads were pressed onto watercolour cardstock and sprayed generously with water to make the colours smooch together. Swirls and dots were added to create a bit of interest and black stamping was added to create a grounding for may images.
 
 
 The little monster was also stamped onto watercolour cardstock and coloured with distress inks.
 
 
 The message was stamped by masking the words needed and using a stamp positioner to place them correctly.
 
 
Next up hubby's birthday card.
 
Distress inks used on a rubber stamps misted with water and stamped onto watercolour card.
TH Crazy Cats again stamped onto watercolour card, coloured with distress inks, cut out and stuck in place. Grounding added with more stamping along with a sentiment.
 
 
Mother's Day cards still to do.
 
Sue X