Thursday, 1 August 2013

Pop Art by Georgie

1st  of August what do I do?
I know, raid mums stash of paints and spectrum noirs.

So with  permission to use the acrylics I began.  
It took me a long time to decide what to do but found inspiration from my outfit (a great Next purchase) also known as a onesie or as I spell it 1zy. I decided to base it on pop art.

Using a canvas I had two years ago, I sketched out what I wanted it to look like.
Then it was time to get messy with paint. At this point mum was worried about the mess and tided up her next project(which is coming along great:-))

Using bright yellow I started to paint the background. Followed by vivid colours for the rest. It was starting to look good.


When the paint was dry I added detailed parts with SPECTRUM NOIRS. On the zig zag pow bubble I used fluorescent orange to make it stand out. I also did a cartoon character with these felts.


There are aspects of this pop art from Andy Warhol and other artists  where they use arrows and explanation marks .


To Finnish it off I added Ben Day Dots also known as SEQUIN WASTE to give it the finishing touches. It is called Ben day dots because a man called Ben Day first used them.  The dots I used were from a stamp by stampers anonymous Bitty grunge CMS089.


Ta Dah!
The finished piece .


Wednesday, 31 July 2013

Where did July go?

Well, what on earth happened to the month of July?

I have a vague recollection of several birthdays including Jess Potts my youngest.
Just turned 9 and about to start middle school, poor thing will not know what's
hit her, she is going from a school with one class of 30 children per year to a school with 120 per year.  Massive change  and there is the whole walking to school on her own thing.

Anyhow enough of that, this week I started a new mini canvas project using Paperartsy Paints,
Treasure Gold, Grunge Paste, Masks and Lin Brown stamps. 

So, I prepared the canvas with a layer or two of gesso, hunted out fresco paints, snowflake, zesty zing, pumpkin soup and blood orange.  I applied them to the canvas with a sponge and mixed the colours to create a starting point. Using the snowflake I used an old bottle top to add in some circle detail and a lollypop stick to add lines in Blood Orange, some was also pushed through some sequin waste.  I picked out a mask and mixed a little zesty zing with grunge paste and pressed through the mask. With the left over grunge paste I added texture to the sides by just lifting the palet knife up from the paste to create peaks.

When it was dry I added a little treasure gold white fire to the raised edges and highlighted the dried grunge paste. I used a text stamp to add detail in
Saffron Archival Ink, using rusty hinge distress ink I added shading to the edges and using a lid off a spray bottle added more circles.

Next bit was fun too, using Lin Brown  Eclectica Stamps I used more fresco paint in hey pesto, guacamole, snowflake, zesty zing, rose and eggplant applied them to stamp with a sponge and stamped onto black card, on some of the paint stamped images I over stamped with black archival ink to add more interest.


 Love this effect. Cut out the shapes and glued them into place.
After a minor mishap when adding a little too much glossy accents, I added small beads around the edge of the flower centres added some ribbon, bow, pins and a moulded rose painted black. Oh and a few words stamped with paint on black card with a layer of treasure gold around the edge.
 
Ta Dah!!

Friday, 28 June 2013

Friends, Summer Fun!

So, here I am again, today I finished a little project I thought about months ago.

I actually started it yesterday and finished it today.  I am totally stunned.


This was a piece of work for my daughters bedroom.
The artwork is complete, however, the bedroom is still waiting for attention.

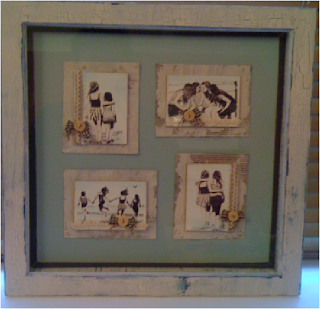
The first thing I did was beg my friend Rebecca for the loan of her Crafty Individuals stamp, Life's a Beach Girlfriends' CI-284 as I had the stamp CI-283 Seaside Friends I felt they would complement each other.  The images were stamped on ATC size stampboard, which originally I was going to etch into, instead I used distress stamp pads pressed onto a craft mat, added a little water to dilute the colour then painted the images with a paint brush.


I then found some bits of lace, ribbon, buttons arranged them together and stuck  it to the stampboard. I cut up a dishwasher tablet box to mount the pictures on, I like the box as when you distress the card it has a fine corrugated texture, this was painted with Paperartsy paints and a bit of crackle glaze.
I ended up visiting Hobby Craft for the frame 12x12 deep edged, I bought a plain pine one so I could use more Paperartsy paints and crackle glaze.  
I found a matching piece of card for the background and used tissue tape to line the inner edge of the box frame. I did consider adding some roses in the corner but thought less was better.
 
Georgie seems to like it,thank heavens.
 
Sue : )

Georgie is responsible for cropping the photos today, wouldn't be surprised if she had her own blog soon.
 

Wednesday, 26 June 2013

Wedding Anniversary Card

Well here goes another post.

Could get used to this posting business as it means I actually finish what I'm working on.
 
I prepared this post yesterday prior to our anniversary and added the photo today, just in case hubby of 15 years decided to check up on me.  LOL.

 
I really  wanted to try out the new Jo Firth Young stamps, the angry bird looking ones, as I think they are quite funky (in their own little way).
 
 I hunted out some left over pieces  of paper that everyone has, because you can't justify throwing them away, I'm sure you know what I mean.
 
I stamped the lovebirds, tree and leaves on the papers and cut them out. I placed them on the background paper to see approx where to stick them down and re-stamped the birds onto the background, I covered these images with a plain cut out bird of the same shape, so that when I re-stamped the  branches they would appear to go round the back of the birds.
 
 I paper pieced the branches and the birds (bodies and beaks) to the background images added the leaves  a little heart, stamped the lovebirds word in the corner and got the sewing machine out...
 
Love sewing things to cards however I think my machine is need of attention as the top tension isn't doing what it is suppose to. Anyhow stiched around the edge in green thread and mounted on a couple of pieces of coloured paper then on to a card blank. Added a stamped Happy Anniversary mounted with a bit of 3D foam and more papers.

Finished!!!

Just in time.
Sue : )

Tuesday, 25 June 2013

Lots of lovely Comments

I wanted to thank everyone for all the super comments about my first ever blog post.
They are very much appreciated and have encouraged me to get stuck into
lots of the half projects I have on the go.
My daughters have also asked if I can put their work on the blog too, how fab is that.
I'm now waiting patiently for the next challenge  can't wait to get started.
Sue : )

Tuesday, 18 June 2013

Triple Wooden Icon

Hi, just finished a project that my friend Rebecca and I started a while back.
Closed/Open

We started by painting the whole thing in one colour of Paperartsy paint followed with a coat of crackle glaze and added a top coat of paint to magically transform and give an old wood appearance (always cool to watch). We sanded it a little and then ran out of time, couldn't leave youngest one the steps of school, could I.

At this point we went our own way in decorating our icons.
Mine went like this.

I coloured a little grunge paste with a spot of paint then pushed it through a mask.
I then stamped script writing in various places. Using Lin Brown stamps from Paperartsy  I stamped with coloured paints onto black paper, cut out the flowers arranged them.
Then die cut several  sizzix grass pieces in black, covered one with paint and layered them up. 
I added a lace trim  and words made from cutting a 9mm length of core card put through my dymo label maker, sanded it lightly to reveal the words which were mounted on to a bit of black card.

There you have it, another half project finished.
Bye


Monday, 17 June 2013

Birthday Cards for Boys


Here goes a second post.

Well thought I'd try a different way of getting photo's on a blog.  It's a lot easier to do it on a laptop as the ipad has a whole different way of uploading the photos and  if you don't have the right techno stuff you are lost (well, I was).
This post  is another test piece for me, I actually made this card  a couple of weeks ago, as usual I left it until the last minute so it was a quick one.
I started with a blank card and stared at it, and stared at it. As I have two girls I didn't have a clue what to do for boys, after a little more staring I hunted out these rather funky fish and crab from  Dylusions by Dyan Reaveley I also used the ocean Backgrounds.
I stamped them using black archival ink and coloured them with distress ink stamp pads pressed onto a craft mat, using a paintbrush adding a little water I coloured in the images to create a watercolour effect. The Happy Birthday stamp was from Jo Firth Youngs range of stamps, everything was then layered up on some patterned paper, task of the day complete.

Not to bad for quick one.
Bye for now.

Saturday, 15 June 2013

Crafty Individuals June 2013 Challenge

Well here it is, finally got a photo but not sure how I did it. :)


Here goes, my crafting friend and I decided to have a  crafting day. So, after dropping off at school, popping to local shop for essentials (cakes) and having a fast burst of cleaning activity, we finally sat down to get messy.
We started with an unpainted wooden beach hut, painted it with Paperartsy paints (love them), I added an embossed metal on card roof (notebook) for texture with a little rose paint to dull the brightness of metal.
Using some old sizzix thin dies we cut out a fence and seagulls (painted them) and suspended them with a metal thread to give the impression of a flying bird.
My girls gave me some tiny shells they had collected years ago to go round the bottom and I used distress embossing powder for the sand effect.
Finally we stamped the lovely beach lady and bunting by Crafty Individuals on cream card and used vintage photo distress ink around the edge to give it a softer appearance.
We also papered the inside which was not an easy task.
That's it for my first ever post. 
Bye for now.